Getting Started
Get up and running with Toggly in 5 minutes. This guide will walk you through creating an account, generating API keys, and making your first feature flag evaluation.
Step 1: Create Your Account
- Visit https://toggly.io and click Sign Up
- Choose your plan (we offer a Free Forever plan with no credit card required)
- Complete the signup form with your email and password
- Verify your email address
Once you've signed up, you'll be taken to the Toggly dashboard where you can start creating feature flags.
Step 2: Create Your First Application
- In the dashboard, click Create Application
- Enter a name for your application (e.g., "My Web App")
- Select your primary environment (Development, Staging, or Production)
- Click Create
When you create your application, Toggly automatically generates an App Key for you. This key allows your application to connect to Toggly and evaluate feature flags.
Step 3: Manage Your App Keys
While an App Key is generated automatically, you can always generate additional keys from App Settings to support different use cases, such as separate keys for your frontend and backend.
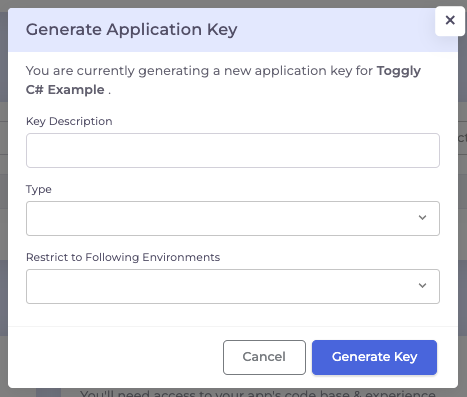
When generating a key, you can configure:
- Key Description: A friendly name to identify the key (e.g., "Frontend iOS App").
- Type: Choose between Front-end or Backend.
- Backend Keys: Have access to the full state of all feature flags in the environment. Use this for server-side SDKs where the code runs in a trusted environment.
- Front-end Keys: Only have access to feature flags that you have explicitly marked as Available to Client SDK. This is crucial for security, ensuring you don't expose internal or sensitive flags to the browser or mobile app.
- Restrict to Environments: Optionally limit the key to work only in specific environments (e.g., only Production).
For getting started, you only need an App Key. API Keys are for advanced programmatic access to the Toggly Management API and are not needed for standard feature flag evaluation.
Step 4: Install an SDK or CLI Tool
Choose the SDK for your platform or install the CLI tool for automation:
.NET
For .NET Core and ASP.NET Core applications.
Install-Package Toggly.FeatureManagement.Web
using Toggly.FeatureManagement.Web.Configuration;
using Microsoft.FeatureManagement.Mvc;

// 1. Configure in Program.cs
builder.Services.AddTogglyWeb(options =>
{
    options.AppKey = "your-app-key";
    options.Environment = "production";
});

// 2. Use [FeatureGate] on Controllers or Actions
[FeatureGate("my-feature")]
public class MyController : Controller
{
    public IActionResult Index() => View();
}
@* 3. Use <feature> tag in Views *@
@addTagHelper *, Microsoft.FeatureManagement.AspNetCore

<feature name="my-feature">
    <p>This content is controlled by a feature flag.</p>
</feature>
CLI Tool
For automating Toggly operations in CI/CD pipelines.
# Download from GitHub Releases
# https://github.com/ops-ai/Toggly.FeatureManagement/releases
# Create a release
toggly-cli create-release \
  --application-id <app-id> \
  --name "v1.0.0" \
  --client-id <id> \
  --client-secret <secret>

# Associate a CI build with a release
toggly-cli associate-build \
  --project-key <app-id> \
  --environment Production \
  --ci-provider github \
  --client-id <id> \
  --client-secret <secret>
React
npm install @ops-ai/react-feature-flags-toggly
import { createTogglyProvider, Feature } from '@ops-ai/react-feature-flags-toggly';

// 1. Wrap your app with the provider
const TogglyProvider = await createTogglyProvider({
  appKey: 'your-app-key',
  environment: 'production'
});

root.render(
  <TogglyProvider>
    <App />
  </TogglyProvider>
);

// 2. Use the Feature component
function MyComponent() {
  return (
    <Feature featureKey="my-feature">
      <p>This feature is enabled!</p>
    </Feature>
  );
}
Go
For server-side Go applications.
go get github.com/ops-ai/Toggly.FeatureManagement/toggly-go@latest
import (
    "context"
    "github.com/ops-ai/Toggly.FeatureManagement/toggly-go/toggly"
)

// Initialize the client
client, err := toggly.NewClient(toggly.Config{
    AppKey:      "your-app-key",
    Environment: "production",
})

// Evaluate a feature flag
enabled, err := client.IsEnabled(context.Background(), "my-feature", toggly.Context{
    Identity: "user-123",
})
PHP
For PHP applications (Laravel, vanilla PHP, or WordPress). WordPress plugin: WordPress Integration.
Core / vanilla PHP:
composer require toggly/feature-management-php
Laravel (includes core; auto-discovers the service provider):
composer require toggly/laravel
Laravel Configuration
Configure your .env file:
TOGGLY_APP_KEY=your-app-key
TOGGLY_ENVIRONMENT=Production
// Laravel Example
use Toggly\Laravel\Facades\Toggly;

if (Toggly::isEnabled('my-feature')) {
    // Feature is enabled
}
iOS (Swift)
For native iOS, macOS, tvOS, and watchOS applications.
Follow the iOS SDK installation instructions for Swift Package Manager or Xcode, including the pending-release notice and exact release reference.
import TogglyCore
import TogglySwiftUI

// 1. Configure in your App init
@main
struct MyApp: App {
    init() {
        Toggly.configure(config: TogglyConfig(
            appKey: "your-app-key",
            environment: "production"
        ))
        Task { await Toggly.shared.initialize() }
    }

    var body: some Scene {
        WindowGroup { ContentView() }
    }
}

// 2. Use @FeatureFlag property wrapper
struct ContentView: View {
    @FeatureFlag("my-feature") var isEnabled

    var body: some View {
        if isEnabled {
            Text("Feature is enabled!")
        }
    }
}
Android (Kotlin)
For native Android applications with Jetpack Compose or Views support.
Add to your build.gradle.kts:
dependencies {
    implementation("io.toggly:toggly-android-core:1.0.0")
    implementation("io.toggly:toggly-compose:1.0.0")  // For Compose
}
import io.toggly.core.Toggly
import io.toggly.core.models.TogglyConfig
import io.toggly.compose.FeatureFlag
import io.toggly.compose.rememberFeatureFlag

// 1. Configure in your Application class
class MyApp : Application() {
    override fun onCreate() {
        super.onCreate()
        Toggly.configure(
            config = TogglyConfig(
                appKey = "your-app-key",
                environment = "production"
            ),
            storage = SharedPreferencesStorage(this)
        )
        lifecycleScope.launch { Toggly.shared.init() }
    }
}

// 2. Use in Jetpack Compose
@Composable
fun MyScreen() {
    val isEnabled by rememberFeatureFlag("my-feature")

    if (isEnabled) {
        Text("Feature is enabled!")
    }
}
Step 5: Create Your First Feature Flag
- In the Toggly dashboard, navigate to Features
- Click Create Feature Flag
- Enter a feature key (e.g.,
new-checkout-flow) - Add a description
- Set the initial state (enabled/disabled)
- Click Create
Step 6: Use the Feature Flag in Your Code
Now you can use the feature flag in your application. Here's a React example:
import { Feature } from '@ops-ai/react-feature-flags-toggly';

function CheckoutPage() {
  return (
    <>
      <Feature featureKey="new-checkout-flow">
        <NewCheckoutFlow />
      </Feature>

      <Feature featureKey="new-checkout-flow" negate={true}>
        <LegacyCheckoutFlow />
      </Feature>
    </>
  );
}
Step 7: Test Your Integration
- Enable the feature flag in the Toggly dashboard
- Check your application to see the feature appear
Note: If you are using an SDK with live updates enabled, the change should appear instantly. Otherwise, you may need to refresh the page.
- Disable the feature flag
- Verify the feature disappears
For local development, we recommend creating a separate environment named Development. This allows you to safely test feature flags locally without affecting your Staging or Production users.
Storing Your App Key
For production applications, never hardcode your App Key. Instead, store it as an environment variable or use a secure secret management system (like Azure Key Vault, AWS Secrets Manager, or HashiCorp Vault).
Next Steps
- Learn about Feature Flags and how they work
- Explore Targeting Rules for gradual rollouts
- Set up Experiments to measure feature impact
- Check out SDK-specific guides for your platform
Need Help?
- Visit our Troubleshooting guide
- Check the API Reference
- Contact support at [email protected]